FAQ: Email usage, email accounts and email configuration
How do I create email accounts?
All accounts at Sanders Hosting include a predefined number of email accounts. Sanders Basic accounts include 5, while Sanders Deluxe accounts have no limit set on the number of email accounts that can be created.
Creating an email account is easy. Just go to the email section of the control panel (you can find a link to it on Sanders Hosting's main page), select "POP3 email accounts", then "New email account". After that, just enter the username for the account, and the password. It will then be created within a minute.
POP3? SMTP? What's that?
On the control panel's main email page, you will find information on what you need to configure your email client (more on that below). These are your account's username, POP3 server, and SMTP server.
A POP3 server is what receives an email addressed to you and stores it until you use your email client to download it. An SMTP server is what your email client communicates with to send an email to a person.
The POP3 server for your email accounts is your domain name (or the IP assigned to you). Your login name (username) is of the form:
username_you_chose%yourdomain.com
Yes, the "%" goes there. Be aware that your email address is [email protected]. username_you_chose%yourdomain.com is just the username you will use to login to your POP3 email account.
For SMTP server, you cau use your ISP's SMTP server, mail.sandershosting.com, or install your own SMTP server. Please read more about our SMTP server below.
What email software do you recommend?
Please check our recommended software page for a list of email clients for different computer platforms.
How do I configure my email software?
Configuring an email client is quite easy. All you have to do is provide the software with information on where to find your POP3 server, SMTP server and your username.
For a step by step explanation on how to configure the most popular email clients, choose your email software/client below:
What do I use as SMTP server?
You can use mail.sandershosting.com as your SMTP server. However, its usage requires a certain procedure to follow. For the server to allow you to send an email, it must first know if you are an authorized user. Since sending emails require no password, our servers will authenticate you by first requesting that you login to one of your email accounts (that is, to check an email account for new emails). When you do that, the server will record your IP (a number assigned to your computer by your ISP, this is usually done automatically when you connect to the Internet) and will authorize a user from that IP to send email for 10 minutes after the IP was recorded. If the 10 minutes go by, just login again to one of your email accounts, and the server will again record your IP. One thing we do recommend is that you install your own SMTP server on your computer. This way, your emails go directly to the target instead of going through your ISP or through our servers. It is more convenient, since something could go wrong with the SMTP server. Read below to learn how to install your own SMTP server on Windows. It's quite easy.
Installing your own SMTP server on your computer
A very good, simple and *free* SMTP server for Windows is Argosoft's Mail Server for Windows 95/98/NT/2000. Please download the free version from the previous link, and install it.
 After installing Argosoft Mail Server, a new icon will
appear on your system tray (the icon is a white mail envelope).
Double click on it to open the program.
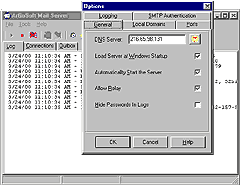
Once that is done, click on Tools, Options. On the General tab, there are various options that you need to set. First, you must provide the software with a DNS server. You can use the DNS server provided by your ISP, or ours (which can be more reliable than those of your ISP). If you want you can use ours (server C3PO, IP: 216.65.98.131). Then, check the options "Load Server at Windows Startup", "Automatically Start the Server" and "Allow Relay".
After that, just minimize the program and you are set to go. You now have your very own SMTP server. Now all you have to do is set your email client to use your SMTP server, usually by giving your email client the address "127.0.0.1" as the location for your SMTP server. The IP "127.0.0.1" is your own computer.
|


